Archive for March, 2010

Synthetic Felt

Friday, March 12th, 2010
 

The building industry is always coming out with new products to benefit both the homeowner and the builder.  Although most of them seem like a great idea at first, they all need to be tested – not just in a lab somewhere, but in the field where real professionals use them and real situations occur.  Only then can the potential of a product be fully realized.

We have been using felt paper (sometimes called black paper or shingle felt or underlayment or tar paper)  for a long time for a variety of uses.  We use it wherever a drainage plain needs to be established, such as behind siding in conjunction with flashing windows and doors and under shingles.  Felt paper is very reliable and has proven itself so for many, many years.  We have discovered what is considered modern day felt paper on homes built as far back as  the 1920’s and 30’s.  Felt paper has its own characteristics that must be considered in the building process.   Its advantages are obvious:  excellent water resistance, good tack and traction on inclined surfaces, easy to work with.  Some of its disadvantages are not so obvious:  It does not breathe well, it absorbs excess heat, it scuffs and marks other objects it comes in contact with, it does not resist wind well.

Felt paper wrinkled after a rainfall

Felt paper wrinkled after a rainfall


I recently discovered another disadvantage of felt paper when a customer called me to tell me his recently papered roof was leaking water.  This rainfall had occur ed during a project in which we were replacing the roof on the house.  We had torn all the shingles off and the felt paper was protecting the home until all the new shingles would be installed.  We take extreme care in making sure the home is watertight during this process for this very reason.  I don’t want to fix ceilings, and I don’t want the homeowner upset for any reason, especially not water coming into his home.  Now the leak was not bad, and it didn’t do any damage because I came over immediately and took care of the problem, but I was surprised at what I found: 

I first looked at the leak in the house.  There was some water dripping from the canister of a recessed light.  I then went onto the roof to find the location of the water leak.  I expected to see some torn felt paper, because we do not leave a job that is vulnerable to water damage.  We put more nails in the felt than the minimum required by the manufacturer, and we design the underlayment to drain as well as the shingles, so after checking the flashing around the chimney and a pipe vent, I found no reason for water to be coming in the house.  I proceeded to investigate the attic, where I discovered the problem.  There were probably 10-12 areas on the underside of the sheathing that were wet, some wet enough to be dripping water.  The leak in the can light had come from water soaking through the sheathing, falling into a joint between two sheets, and running down a rafter and onto the ceiling drywall and thus into the can light.  I was perplexed that so many spots were wet when the felt paper was not damaged or compromised in any way that I could see.   Back on the roof, I looked a little closer and could see what was going on.

I have never had this happen before, but after some careful thought, I had determined the cause.  The night before after we had applied the paper, it was smooth and dry.  In the later hours of the night we got a small shower – which did not leak into the house.  The shower did wrinkle the felt paper, as it does when it gets wet.  The next morning we received another small shower on top of the already wrinkled felt.  Instead of draining the water off, the wrinkles were causing the water to stop, pool up, and finally to run backward under the previous row of felt.  This roof was 4/12 pitch, which is common for a lot of ranch homes built 30 years ago, but it is not the best for roof drainage.  Many shingle manufacturers do not recommend applying their product to a pitch any shallower than this.  If this had been a steeper roof, this problem may not have happened.    It was so humid between the two showers that the felt could not dry out enough to smooth down some of the wrinkles, and the repeat shower caused the damage.  This was the first and the last time that felt paper will let me down in this situation.

Picture syn felt

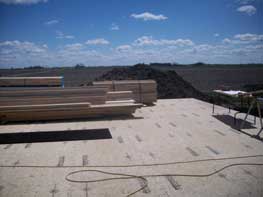
Synthetic felt does not behave the same way as tar paper

There is another product that we have begun using that eliminates this problem from occurring.  It is called synthetic felt.  A smart alternative to felt, it is water’s toughest opponent, creating a secondary water barrier that reduces the incidence of leaks caused by storm damage, wind-driven rain, ice dams and worn roofing materials. It is a waterproof, synthetic polymer material that will protect your home against moisture intrusion.  There are several advantages to this product over felt:  it has a higher perm rating (breath-ability), it is much more wind resistant, it covers the roof faster because it comes in larger rolls and has a wider coverage, and it is much lighter and doesn’t leave a tar residue on anything it touches.  It also is a more stable product and does not wrinkle when it gets wet, so I have decided to use it to protect both the homes I work on and the relationships I have with the people who own those homes.

We make it a point to provide the best possible products and services to our valued customers and their homes.  If you are considering a roof and want a company that cares as much about every aspect of your roof as you do, give us the opportunity to provide you with a detailed quote.

Ice Dam Prevention

Friday, March 5th, 2010
 
Damage to Roof Sheathing from Ice Damming

Ice damming can occur on any home with a pitched roof.  Winter snow begins to melt from the heat escaping from the attic on the underside of the roof sheathing.  As it melts, water runs down the roof towards the eaves.  The portion of the roof that extends past the wall on the bottom of the roof (commonly known as the overhang) does not receive any of the heated air rising out of the attic, so the snow does not melt at this location.  When the water reaches this point, it becomes trapped and begins to cool, resulting in an ice dam.  As water begins to pool behind the dam, it will begin to rise until it has enough pressure to run backwards up the roof.  Shingles are designed to drain water runoff from one direction only.  When water reversed direction, there is not protection.  Water can get up under the shingles as it travels backward up the roof until it finds a relief where it will again descend the roof plane – but this time under the shingles.  This problem can not only happen at the eave location, but also in valleys, areas around protrusions such as pipes, skylights, and vents, and also at locations where the roof meets a wall.  Damage to the eave line can also be caused by gutters that have not properly been cleaned.  If eaves troughs are full of leaves and water can not get away, it will sit on the roof long enough to build pressure and find its way under the shingles.

Application of WinterGuard

Appliction of WinterGuard

We design our roof applications so they will handle any type of water infiltration.  The last layer of defence against the elements is the first layer applied to the sheathing, and it should drain as well as the top layer.  That is why it is so important to use a product like WinterGuard.   WinterGuard is a composite material of asphalt polymers, formed into a rolled sheet. The asphalt makes it vapor-tight, and the polymers make the asphalt elastic and sticky. This protective barrier is able to stretch and seal around nails driven through it. Placing WinterGuard a minimum of 24″ past the interior wall line at the eave provides the best line of defense against ice damming.  WinterGuard is warranted against manufacturing defects and to remain watertight for the same period as the warranty duration carried by the shingles applied above it — up to a maximum of 50 years.  This product can also be used under metal roofs and in other applications involving flashing details.

We use Winterguard as part of our underlayment process on a roof system, which is just as important as the shingles themselves.  Shingles are designed to shed water, but they are not waterproof.  When water does get underneath the asphalt, the sublayer must be able to handle it. 

Some sure signs that ice damming may be occurring:

  • Snow is melting but there is a line of ice or snow at the eaves that is not draining
  • Water is dripping out of the soffit or gutter
  • Shingles appear worn or faded on overhangs
  • Shingles have rolling humps or dips on eave line
  • Interior side of walls or ceilings have water damage under eaves

If you are concerned that ice damming is occurring on your home, give us a call and we will be glad to come out and make an inspection. 


Designing for Insulation

Monday, March 1st, 2010


One of the most important steps in building a new home includes the insulation process.  In the past, simply erecting the frame of a home and then coming back and insulating the structure as it stands was the standard.  But today, higher utility bills and improved technology have given us the incentive and the possibility to improve our homes insulating performance dramatically. 

Knee Wall at Sill Location

Knee Wall at Sill Location

Insulation must be considered in the design process of a home if it is to be put to its maximum potential.  New home details such as cathedral ceilings, cantilevered floors systems, special nooks and so on that have become so popular with custom home building present new problems for insulation.

This picture is a perfect example.  Engineered floor systems are superior to dimensional framing because of their stability in temperature and humidity changes, longer span capabilities, and straighter and more uniform characteristics.  But they also pose a problem with insulation in one particular area:  along the box sill, or the area between the top of the floor system and the top of the foundation wall.  With a dimensional lumber (2×10, 2×12, etc.) floor system,  a joist is usually placed on the outside of the floor system (often called the rim joist), and then insulation can be applied to this joist on the inside of the house.  An enginered floor joist, or I joist,  is constructed differently.  The top and bottom of the joist are wider than the middle (web) portion.  If a joist is placed against the rim on the outside of the floor system, it creates an uninsulatable gap in which warm air will leave the home.  Instead of using an I  joist for this location, if a knee wall is constucted in its place it will allow the framing to remain load bearing, but yet leave a space for insulation to be applied.  After the framing is complete and the home is ready for insulation, the insulator can simply reach into the cavity and spray the entire wall with foam and thus achieve a completely sealed cavity and the homeowner does not have to worry about his hard earned cash slipping through the gaps in the floor and rushing into the cold winter air.

Little details like this can make a big difference in a home that will be in operation for years and years to come, whether it’s in the floor system, the construction of the corners and partitions, the attic and ventilation system, or any part of the house.  Our company prides itself on making small but smart decisions like this to benefit the homeowner long after the job is done and our contract is fulfilled.