Archive for the ‘Common Home Problems’ Category

Leaky basement?

Wednesday, September 22nd, 2010

Why does my concrete basement leak? Most people do not realize how porous concrete really is. Air pockets, or tiny pores constitute 12 to 18% of the concrete mass. During the drying and curing process of a concrete pour, almost half of the water has to evaporate. As this moisture rises to the top of the slab, it creates channels of air that become a vast network for channeling water. In addition, water that collects behind concrete, whether under the floor or against the sidewalls, builds pressure until it drives through the surface into the home. Almost every house has an issue with moisture in the basement, even those built with the best of intentions. The older the house, the worse the situation is.

Moisture in home can cause BIG problems. The basement is the number one source for water infiltration into a home. High levels of humidity in the home can cause the growth of mold and mildew, encourage and facilitate rot and decay of structural members, increase condensation on doors and windows, cause floors to buckle and walls to crack, provide a thriving environment for insects like ants and termites, and cause irritation and allergic reactions that can trigger asthma, migraines, and other health problems for starters. Controlling the moisture in your home is a big deal.

To help keep your home safe, we can provide you with the following services:

  • install a working sump pump.
  • remove damaged, cracking, or buckling foundation walls and replace.
  • install drains in the slab or around footings.
  • waterproof the exterior of your basement walls and regrade and reseed your lawn.
  • inject a high-pressure epoxy or polyurethane solution into cracks.
  • insulate your basement with a closed cell foam product that is moisture resistant and does not allow the passage of water vapor.
  • install seamless gutters and downspouts on your home, including gutter guards and extensions.

Here are a few ideas for you to consider tackling if you have a problem with water in your basement:

  • check your gutters and downspouts. Inspect your eaves troughs to make sure they are not plugged with leaves and other debris, and make sure that the water coming down your downspout can get away from the edge of the house, preferably 4 to 6 feet away. If necessary, install extensions on your downspouts to direct water away from the foundation.
  • Watch out for shrubs and other plants that are too close to your foundation. Root systems from plants and larger shrubs can create pathways for water to flow against your foundation. Keep plants at least 12 inches away from the foundation.
  • Check your landscape for the proper fall. Ideally, there should be a minimum drop of 2 inches per foot as you move away from your house. Even if you capture all the water exiting your roof, surface water on your lawn can still flow toward your basement walls if the ground is not sloped correctly.
  • Seal the walls and slab in your basement with a penetrating sealer, such as RadonSeal. Any mold, mildew, salt, lime deposits, or efflorescence (white gritty staining) must be removed with a muriatic acid and elbow grease prior to the application of the sealer.
  • install a dehumidifier with a garden hose attachment and drain it into your sump pump.
  • Go to your local hardware store and buy a sump pump with a water pressure backup option

For more information on any of these services or a free quote, contact us today!

Ice Dam Prevention

Friday, March 5th, 2010
 
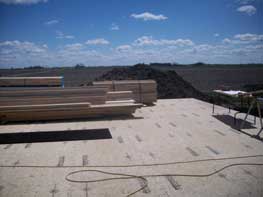
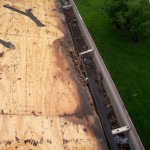
Damage to Roof Sheathing from Ice Damming

Ice damming can occur on any home with a pitched roof.  Winter snow begins to melt from the heat escaping from the attic on the underside of the roof sheathing.  As it melts, water runs down the roof towards the eaves.  The portion of the roof that extends past the wall on the bottom of the roof (commonly known as the overhang) does not receive any of the heated air rising out of the attic, so the snow does not melt at this location.  When the water reaches this point, it becomes trapped and begins to cool, resulting in an ice dam.  As water begins to pool behind the dam, it will begin to rise until it has enough pressure to run backwards up the roof.  Shingles are designed to drain water runoff from one direction only.  When water reversed direction, there is not protection.  Water can get up under the shingles as it travels backward up the roof until it finds a relief where it will again descend the roof plane – but this time under the shingles.  This problem can not only happen at the eave location, but also in valleys, areas around protrusions such as pipes, skylights, and vents, and also at locations where the roof meets a wall.  Damage to the eave line can also be caused by gutters that have not properly been cleaned.  If eaves troughs are full of leaves and water can not get away, it will sit on the roof long enough to build pressure and find its way under the shingles.

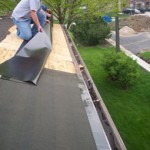
Application of WinterGuard

Appliction of WinterGuard

We design our roof applications so they will handle any type of water infiltration.  The last layer of defence against the elements is the first layer applied to the sheathing, and it should drain as well as the top layer.  That is why it is so important to use a product like WinterGuard.   WinterGuard is a composite material of asphalt polymers, formed into a rolled sheet. The asphalt makes it vapor-tight, and the polymers make the asphalt elastic and sticky. This protective barrier is able to stretch and seal around nails driven through it. Placing WinterGuard a minimum of 24″ past the interior wall line at the eave provides the best line of defense against ice damming.  WinterGuard is warranted against manufacturing defects and to remain watertight for the same period as the warranty duration carried by the shingles applied above it — up to a maximum of 50 years.  This product can also be used under metal roofs and in other applications involving flashing details.

We use Winterguard as part of our underlayment process on a roof system, which is just as important as the shingles themselves.  Shingles are designed to shed water, but they are not waterproof.  When water does get underneath the asphalt, the sublayer must be able to handle it. 

Some sure signs that ice damming may be occurring:

  • Snow is melting but there is a line of ice or snow at the eaves that is not draining
  • Water is dripping out of the soffit or gutter
  • Shingles appear worn or faded on overhangs
  • Shingles have rolling humps or dips on eave line
  • Interior side of walls or ceilings have water damage under eaves

If you are concerned that ice damming is occurring on your home, give us a call and we will be glad to come out and make an inspection. 


Why Does my Ceiling Crack?

Sunday, February 21st, 2010

The Symptoms:  I have noticed in the winter time that cracks have been appearing between my walls and ceilings.  As it gets colder, the crack gets wider.  I have even had it patched once but the crack came back the next winter.  What is going on?

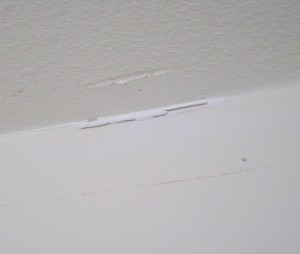
Cracks in the drywall between the wall and the ceiling

Cracks in the drywall between the wall and the ceiling

The Problem:  This cracking cycle is all caused by the weather. Your roof is most likely built with an engineered truss system – where a single unit comprises both the rafter and the ceiling joist and is joined together with webbing and gusset plates.  What is happening is called “uplift”, and it only happens to the interior walls of the home.   The individual trusses that make up your roof system are constructed from #2 and better structural grade southern yellow pine, which like all wood will move with humidity and temperature changes.  When the weather changes from warm to cool, the trusses react to the colder temperatures and lower humidity.  The crack may go away in the summer time because the temperature and the humidity are high.  At this time the truss is “swelled” or expanded slightly from the environment around it, and as a result it flexes pressure down onto the wall plate, tightening the crack in the wall/ceiling joint.  In the winter time, the truss begins to “shrink” or contract.  Since it is one unit tied together, the webbing of the truss will pull the bottom plate of the truss upward as it contracts.  This is known as “uplift”.  When it pulls up, the drywall on the ceiling comes with it, thus widening the crack.  No matter how much insulation you have in your attic, you cannot prevent this uplift from occurring.  The trusses will move unless the humidity and temperature of the surrounding environment is completely stabilized, which is not possible.

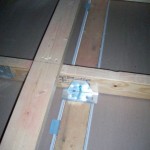
Truss Floater Bracket

Truss Floater Bracket

The Solution:  People have tried various remedies to combat this nuisance and prevent it from happening.  Attaching the truss the wall with nails or screws only worsens the situation.  As the trusses pull up, the walls will begin to lift as well, which can cause more cracking in the walls, out of adjustment doors, and floor squeaks.  In some extreme cases, the wall can be lifted far enough off the floor to leave a visible gap.

The only solution to this problem is to use special hardware and techniques when installing the drywall.  This is a picture of an attic just prior to insulation.  You can see the truss floater bracket in place.  This piece of hardware allows for the stability of the truss as it “floats” up and down with the seasonal changes.  The outer tabs of the bracket project out over the drywall and keep it in place.  The drywall must not be fastened with in 16″ of the location of the bracket so that the ceiling can flex as the truss moves but remain fixed at the wall location.  The second smaller piece of hardware in the foreground is a drywall clip, which sandwiches the ceiling drywall and is attached to the wall plate to help keep the ceiling rigid.  This piece can be used in conjunction with the floater bracket.

If your home was built without the use of this technique, the fasteners securing the drywall to the trusses at the wall location must be removed to eliminate this problem.   Every fastener within 16″ of any interior wall location that is showing signs of movement must be located and removed, and some minor ceiling repairs will be necessary.  An inspection of the attic to make sure no trusses are fastened to the walls would also be a good idea.  You can contact us for an inspection to see how we can solve your problem.

Properly installing the drywall is a vital part of preventing maintenance issues and headaches for homeowners.  Our company has professionals in place and we have the experience and the knowledge to save you time, money, and stress down the road.  And our work comes with a guarantee, so you can rest assured that it will be done right!