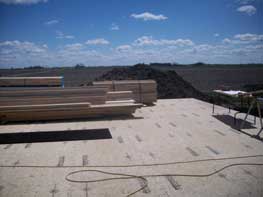
For the last 10 years, MJ Construction (owned by Melanie and  Jeb Kennel in Gifford) has been building custom homes and completing remodeling projects in central Illinois. We have completed over 400 remodeling jobs and 10 custom homes in just the last two years. In addition to our highly trained and dependable workforce of carpenters and remodelers, we maintain our own roofing and electric license. If you have a fall or winter project that needs the experience and trust of a qualified company, give us a call today.
October 17th, 2010
Foundation Comparison: Poured Walls vs. Precast
October 2nd, 2010If you are building a new home in the near future, you may want to consider what type of foundation you’re going to install. The most popular foundation system in America is the poured wall. In the past, block walls have also been used excessively. There is a new kid on the block: precast concrete. There are a handful of manufacturers in the United States that produce these types of building foundations for residential and commercial use.
This phenomenon is catching on among enthusiastic homeowners looking for alternatives to traditional building practices. But what do we know about precast wall systems? How do they compare with traditional foundations? Are there specific advantages or disadvantages of using either product? The foundation is a big part of the home building process, and it is something that cannot be changed once installed.
The concept of the poured wall system is efficiency. It has superior drainage qualities and is set up to finish your basement immediately. Though brands may differ slightly, generally the walls are composed of a 2” thick concrete face on the exterior poured against a rigid foam insulation board sandwiched between the outer face and the concrete (steel reinforced) studs 24” on center. The bottom and top plate transfer the load to the footing, which is composed of crushed rock. The crushed rock footing allows for water drainage from under the slab to the exterior tile. For more information on a local installer, visit the Superior Walls website.
In 2009, I had the golden opportunity to compare both types of foundations on the same exact house. We built two houses in 2009 that had the same footprint (although the floor plans were slightly different); one in the spring, one in the fall. We installed the precast system in March, and the poured wall for the similar house was installed in August. The results of the comparison both surprised and educated me.
The cost is usually the main consideration of the homeowner when comparing two different products. The following table breaks down the cost differences:
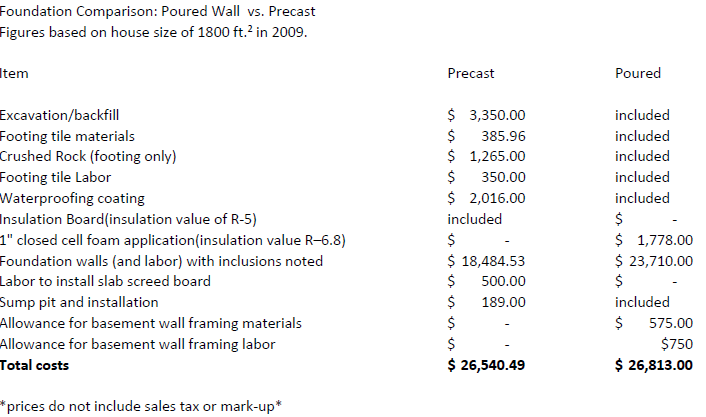
As evidenced by the numbers, there is very little difference in the price. On these two jobs several items need to be considered. In 2010, the state of Illinois adopted a new energy code, the International Energy Conservation Code (IECC) which now requires basements to be insulated to a value of R-10 in climate zone five (where East Central Illinois is located). The particular manufacturer that we have used in the past, Superior Walls, has a standard wall system with the value R-5 and their “xi” version which has an R value of R–12.5. In 2009 before the code was passed, we used the R-5 system for the precast and sprayed a 1” layer of closed cell foam on the poured wall site. Neither of these options would pass today.
In addition, because of today’s emphasis on the energy code, building officials are now paying extra attention to key areas of the house, including the basement walls. Now with the demand for mandatory insulation on the walls, the issue of fire resistance comes into play. Most foam products do not have the necessary smoke and flame spread ratings needed to be left exposed, so a fire barrier of some sort must shield both the rigid foam board on the precast system and the spray applied foam on the poured wall. There are several options out there, including thermal blankets and fiberglass insulation, but the most sensible option when you start comparing costs and products is to just finish the basement walls with drywall, something that is going to begin to catch on as this new code is enforced. Homeowners who once considered whether or not they were going to finish the basement down the road now no longer have that option.
With all that taken into account, let’s look at the comparison:
- Installation – precast walls can be completed quickly – often in just a day or two and are not as susceptible to weather delays
- Precast walls are poured in a factory setting, assuring the quality of cement mix (no extra water is added on site, which can weaken the concrete)
- Precast walls are typically poured at a higher psi – around 5000. Poured walls are a lower 3500 psi. However, the poured wall is solid throughout rather than 24” on center, so it doesn’t need the stiffer mix necessarily.
- Pea gravel footing of precast option allows for superior drainage. Rising water under the basement slab can flow to the footing tile through the crushed rock footing. On a poured wall system, water has to get around the concrete footing to reach the tile, which builds pressure, or flow into a secondary tile inside the footing to get out.
- Certain soil types that are weaker (sandy, silt) are not ideal for precast applications.
- Precast systems are relatively new in the residential field and homeowners, building officials, flatwork contractors, and builders alike are skeptical of them. Builders may charge more to build on a precast system because of the learning curve. There are a few minor extra steps that must be taken (mainly additional bracing and a delay in backfill) with the precast system that will increase the labor costs from the builder. Do your homework and choose a builder that has experience with the precast system installation, or you may pay for it.
- Use of a precast system requires a little more coordination on the part of the general contractor, including scheduling rock delivery, flatwork, excavation and tile work.
- Precast option reduces the chance for stress cracks in the wall system with controlled joints in the panels, but relies heavily on sealant to keep water out
- Precast options may come with a warranty. Superior Walls carries a 15 year limited warranty. Poured walls usually do not have a guarantee.
- Precast walls are pre insulated and ready for drywall. The concrete studs have holes to accommodate plumbing and electrical.
- Precast advocates boast that since the walls are poured square at the factory, the final product is guaranteed to be plumb, level, and square. However, as with any product, installation can make it or break it. We have built on both precast and poured walls numerous times, and there is no guarantee that either product is superior in this regard.
- Precast walls are steel reinforced. Many times poured walls are not, especially in areas where the building code is not enforced.
A sound investment takes much thought and planning. Making the right call on your foundation is a big decision. Do your homework, go out and look at different foundations, talk to the people that live in those houses, talk to an experienced contractor, and think about your future carefully. Then make an educated choice knowing you can sleep at night because you gave yourself the best possible situation to make your mind up in.
For a detailed quote on a foundation for your new home contact us today.
Leaky basement?
September 22nd, 2010Why does my concrete basement leak? Most people do not realize how porous concrete really is. Air pockets, or tiny pores constitute 12 to 18% of the concrete mass. During the drying and curing process of a concrete pour, almost half of the water has to evaporate. As this moisture rises to the top of the slab, it creates channels of air that become a vast network for channeling water. In addition, water that collects behind concrete, whether under the floor or against the sidewalls, builds pressure until it drives through the surface into the home. Almost every house has an issue with moisture in the basement, even those built with the best of intentions. The older the house, the worse the situation is.
Moisture in home can cause BIG problems. The basement is the number one source for water infiltration into a home. High levels of humidity in the home can cause the growth of mold and mildew, encourage and facilitate rot and decay of structural members, increase condensation on doors and windows, cause floors to buckle and walls to crack, provide a thriving environment for insects like ants and termites, and cause irritation and allergic reactions that can trigger asthma, migraines, and other health problems for starters. Controlling the moisture in your home is a big deal.
To help keep your home safe, we can provide you with the following services:
- install a working sump pump.
- remove damaged, cracking, or buckling foundation walls and replace.
- install drains in the slab or around footings.
- waterproof the exterior of your basement walls and regrade and reseed your lawn.
- inject a high-pressure epoxy or polyurethane solution into cracks.
- insulate your basement with a closed cell foam product that is moisture resistant and does not allow the passage of water vapor.
- install seamless gutters and downspouts on your home, including gutter guards and extensions.
Here are a few ideas for you to consider tackling if you have a problem with water in your basement:
- check your gutters and downspouts. Inspect your eaves troughs to make sure they are not plugged with leaves and other debris, and make sure that the water coming down your downspout can get away from the edge of the house, preferably 4 to 6 feet away. If necessary, install extensions on your downspouts to direct water away from the foundation.
- Watch out for shrubs and other plants that are too close to your foundation. Root systems from plants and larger shrubs can create pathways for water to flow against your foundation. Keep plants at least 12 inches away from the foundation.
- Check your landscape for the proper fall. Ideally, there should be a minimum drop of 2 inches per foot as you move away from your house. Even if you capture all the water exiting your roof, surface water on your lawn can still flow toward your basement walls if the ground is not sloped correctly.
- Seal the walls and slab in your basement with a penetrating sealer, such as RadonSeal. Any mold, mildew, salt, lime deposits, or efflorescence (white gritty staining) must be removed with a muriatic acid and elbow grease prior to the application of the sealer.
- install a dehumidifier with a garden hose attachment and drain it into your sump pump.
- Go to your local hardware store and buy a sump pump with a water pressure backup option
For more information on any of these services or a free quote, contact us today!
Getting your home ready for winter.
September 15th, 2010Although the weather is still warm and you’re probably thinking about pumpkins, wiener roasts and hayrides, winter weather is just around the corner. We can all look forward to freezing temps and higher heating bills.
Here is a list of services we can help you with:
- Professionally inspect your furnace. Clean your ductwork and check for leaks.
- Professionally inspect your fireplace and chimney to make sure it is in working order and to prevent rodents and birds from entering your home.
- Clean out your gutters and install gutter guards to prevent water build up and ice damming.
- Install high efficiency replacement windows and doors.
- Tuck-point or seal foundation cracks and inspect sill plates for dry rot or termite damage.
- Insulate exposed plumbing pipes in crawlspace. Install heat tape to prevent pipes from freezing. Install a tankless hot water system.
- Seal driveways brick patios and wood decks.
- Check flashings on roof and walls to ensure water cannot enter the home. Replace worn or missing roof shingles.
- Add cellulose insulation to the attic floor.
- Remove casing around doors and windows and insulate with a minimally expandable foam
- Inspect steps and handrails and make sure that they are safe and in good working order
- Perform a semiannual inspection on all areas of your home
- Provide you with firewood
Here are some really simple tips you can do on your own to help make it just a little bit easier:
- Trim trees and remove dead branches to prevent them from falling on your house or car when loaded with ice. After all the leaves have fallen, clean out your gutters and remove fallen leaves from around your foundation. Secure crawlspace entrances and other entry points to keep small animals from crawling under the house.
- Change your furnace filters for forced air units, and remove the shroud and vacuum around electric heat baseboard units. Remove any flammable material that might be around your furnace. Install working smoke alarms and carbon monoxide detectors. Buy a fire extinguisher or replace an extinguisher that is more than 10 years old. Install a programmable thermostat. Turn down your thermostat and dress a little warmer.
- Check and replace any leaking door seals, including weather stripping and thresholds. Inspect the exterior of your home for any cracks and fill with caulking. Cover any window wells to basement windows with plastic shields. Remove summer screens and replace with glass inserts.
- Close off bedroom doors and other rooms that are not used. Open blinds to rooms that receive a lot of sunlight, and use heavier window treatments and close them at night. Install a window insulation kit from a local hardware store
- Disconnect hoses and shut off water to your exterior faucets. Make sure your main water valve is functioning properly. If you go on vacation, leave the heat set to at least 55°.
- Service or tune-up your snow blower. If burning wood is an option and you have a place to store it, by firewood now while it is plentiful and cheaper.
- Prepare an emergency kit, including indoor candles or lamps, working flashlights and batteries, extra bottled water and nonperishable food items (including pet food), blankets, and a first aid kit in an accessible location. Keep important contacts, like your utility companies phone numbers, handy.
- Talk to your accountant to see which energy tax incentives you may qualify for
For a free estimate on any of these services, please contact MJ Construction. We would be glad to service your home. Have a great winter season!
Help, I need a new roof!
September 7th, 2010Replacing a roof on a home is a big investment. How do you know which products will get you the best bang for your buck? Who should you have install it?
First you need to find the right contractor. Just thumbing through the yellow pages and dialing the first name that jumps off the page is not going to cut it. Find 3 or 4 local firms and start doing some research. Does this company carry insurance in case someone gets hurt at my house? Is this contractor licensed? What happens if there is a rainfall during the process or removing my roof and my home is not protected? What kind of warranty does this installer provide?
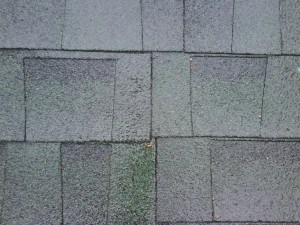
Poor installation can ruin a roof job. Notice the joints of successive rows are in line with each other
Other more subtle questions that don’t often get asked might include “Does this guy really know what he is doing to my home?” I have been to so many calls where a brand new roof is leaking, and it’s always the installation that causes the problem.
A good roofer can make the poorest of products work, but in the hands of a poor contractor that doesn’t understand what he is doing, even the best products will not perform.
The most important things you can do are to check references, check references, check references. Ask the contractor for names and addresses of past clients so you can go see his work and talk to his customers. What kind of work does he really do? How does he treat customers? How does he respond to warranty issues? A little extra time and effort can save a lot of trouble later.
What about products? Is one shingle better than another? The market is flooded with different shingle types and manufacturers. Shingles have come a long way from the tar blobs of the 70’s and the fiberglass curlers from the 80’s. Today’s shingles now boast a combination of a fiberglass mat for tear strength and stability, and an asphalt additive which provides the water resistance and bonds the shingle together. In addition to the actual product, you must consider the manufacturer behind them. Is this company in good financial standing? What happens if there is a problem 10 years down the road and this shingle company is out of business? What kind of warranty does this company provide for their products?
I recommend CertainTeed Corporation®, an innovative company that has been around for quite awhile and appears to be staying put. CertainTeed manufactures many types of building products and is an industry leader in shingle technology. By first educating and then working with contractors, they provide a warranty that is second to none, and the best part of it is that it doesn’t cost the customer.
Generally homeowners are only concerned with two areas when it comes to putting on a roof: the color and style of shingles. However, a good roofer knows that the roof is comprised of more than just the shingles alone. A roof system that will last the test of time must be designed and applied to shed water underneath the shingles, as if they weren’t even there; because guaranteed: water will find its way under the shingles.
In addition to providing contractors with the proper education to install a good roof system, CertainTeed also requires the use of quality underlayment products and flashing procedures. Details like flashing, penetrations, ventilation, and ice dams, to name a few, can ruin a roof job and potentially other parts of the home if installed incorrectly. Other manufacturers also carry similar warranty programs. Make sure you select a certified contractor from the manufacturer where your shingles came from to receive the best warranty possible.
Three areas are key in deciding what product to use on your roof: Quality, Cost, and Curb Appeal. The better the curb appeal, the higher the cost. The cheaper the shingle is, the more the quality will suffer for it.
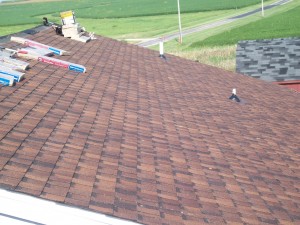
Landmark Series 50 year Burnt Sienna
CertainTeed provides several options for any homeowners taste.
The Landmark Series® shingle is an architectural (often referred to as laminate or “fake shake”) line of shingles providing a good quality shingle at an affordable price. As the name suggests, the shingle is comprised of two layers laminated to each other to provide a nice weighty shingle that has increased wind resistance and sealant capabilities. The Landmark is available in 25 different colors and three different durations.
The cheapest shingle by far on the market today is the old style three tab or three in one, which was very popular from the late 40’s to the early 90’s when the architectural style began to take its place. This shingle is thinner and has issues with wind resistance, particularly out in the country, because of its light weight and design.
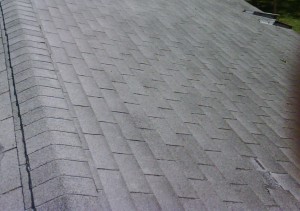
Three Tab Shingles are becoming outdated.
We do not typically install these shingles unless we are matching an existing roof or have a special situation that requires their use.
The Presidential style shingle is a very nice, heavy shingle that performs very well and promises great wind resistance capabilities and a long life. The shingle is composed of three layers, giving it a meaty appearance with very stark profile contrast for enhanced aesthetics. This heavier shingle will add cost both for the material and the more intensive installation cost. The Presidential line comes in 14 color options.
In the past I have suggested to people to delay replacing their roof as long as they can to increase the relative longevity of the next roof, but in today’s fast changing and unstable market, that is no longer the case.
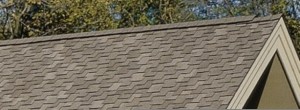
Presidential shingles have a distinct profile appearance
As fluctuations in the oil market drive costs, shingle prices continue to increase as well as other asphalt based products involved in building a home. Any large investment in your home should pay you dividends down the road. Taking a little time and effort to make good decisions now will benefit you in the long run.
Synthetic Felt
March 12th, 2010The building industry is always coming out with new products to benefit both the homeowner and the builder. Although most of them seem like a great idea at first, they all need to be tested – not just in a lab somewhere, but in the field where real professionals use them and real situations occur. Only then can the potential of a product be fully realized.
We have been using felt paper (sometimes called black paper or shingle felt or underlayment or tar paper) for a long time for a variety of uses. We use it wherever a drainage plain needs to be established, such as behind siding in conjunction with flashing windows and doors and under shingles. Felt paper is very reliable and has proven itself so for many, many years. We have discovered what is considered modern day felt paper on homes built as far back as the 1920’s and 30’s. Felt paper has its own characteristics that must be considered in the building process. Its advantages are obvious: excellent water resistance, good tack and traction on inclined surfaces, easy to work with. Some of its disadvantages are not so obvious: It does not breathe well, it absorbs excess heat, it scuffs and marks other objects it comes in contact with, it does not resist wind well.
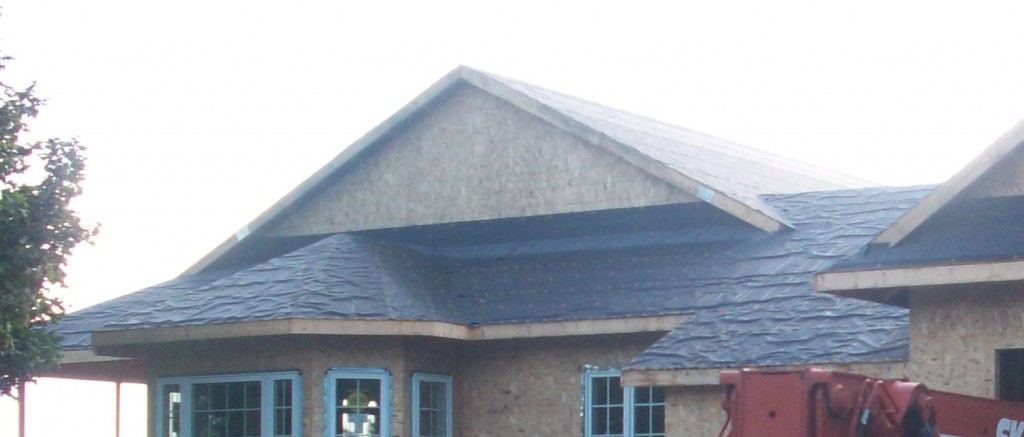
Felt paper wrinkled after a rainfall
I recently discovered another disadvantage of felt paper when a customer called me to tell me his recently papered roof was leaking water. This rainfall had occur ed during a project in which we were replacing the roof on the house. We had torn all the shingles off and the felt paper was protecting the home until all the new shingles would be installed. We take extreme care in making sure the home is watertight during this process for this very reason. I don’t want to fix ceilings, and I don’t want the homeowner upset for any reason, especially not water coming into his home. Now the leak was not bad, and it didn’t do any damage because I came over immediately and took care of the problem, but I was surprised at what I found:
I first looked at the leak in the house. There was some water dripping from the canister of a recessed light. I then went onto the roof to find the location of the water leak. I expected to see some torn felt paper, because we do not leave a job that is vulnerable to water damage. We put more nails in the felt than the minimum required by the manufacturer, and we design the underlayment to drain as well as the shingles, so after checking the flashing around the chimney and a pipe vent, I found no reason for water to be coming in the house. I proceeded to investigate the attic, where I discovered the problem. There were probably 10-12 areas on the underside of the sheathing that were wet, some wet enough to be dripping water. The leak in the can light had come from water soaking through the sheathing, falling into a joint between two sheets, and running down a rafter and onto the ceiling drywall and thus into the can light. I was perplexed that so many spots were wet when the felt paper was not damaged or compromised in any way that I could see. Back on the roof, I looked a little closer and could see what was going on.
I have never had this happen before, but after some careful thought, I had determined the cause. The night before after we had applied the paper, it was smooth and dry. In the later hours of the night we got a small shower – which did not leak into the house. The shower did wrinkle the felt paper, as it does when it gets wet. The next morning we received another small shower on top of the already wrinkled felt. Instead of draining the water off, the wrinkles were causing the water to stop, pool up, and finally to run backward under the previous row of felt. This roof was 4/12 pitch, which is common for a lot of ranch homes built 30 years ago, but it is not the best for roof drainage. Many shingle manufacturers do not recommend applying their product to a pitch any shallower than this. If this had been a steeper roof, this problem may not have happened. It was so humid between the two showers that the felt could not dry out enough to smooth down some of the wrinkles, and the repeat shower caused the damage. This was the first and the last time that felt paper will let me down in this situation.
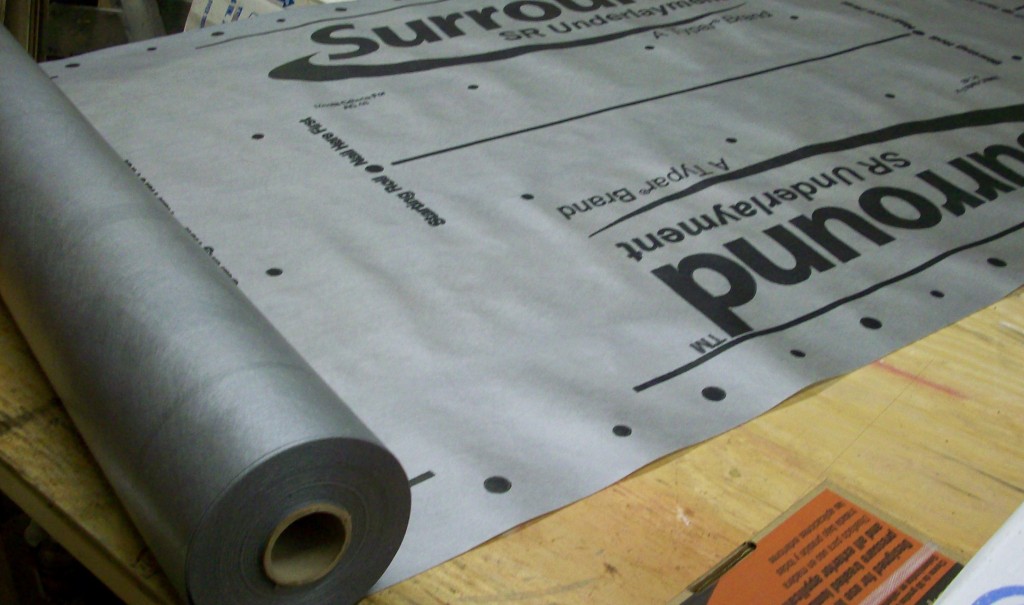
Synthetic felt does not behave the same way as tar paper
There is another product that we have begun using that eliminates this problem from occurring. It is called synthetic felt. A smart alternative to felt, it is water’s toughest opponent, creating a secondary water barrier that reduces the incidence of leaks caused by storm damage, wind-driven rain, ice dams and worn roofing materials. It is a waterproof, synthetic polymer material that will protect your home against moisture intrusion. There are several advantages to this product over felt: it has a higher perm rating (breath-ability), it is much more wind resistant, it covers the roof faster because it comes in larger rolls and has a wider coverage, and it is much lighter and doesn’t leave a tar residue on anything it touches. It also is a more stable product and does not wrinkle when it gets wet, so I have decided to use it to protect both the homes I work on and the relationships I have with the people who own those homes.
We make it a point to provide the best possible products and services to our valued customers and their homes. If you are considering a roof and want a company that cares as much about every aspect of your roof as you do, give us the opportunity to provide you with a detailed quote.
Ice Dam Prevention
March 5th, 2010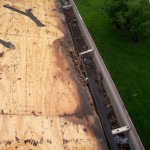
- Damage to Roof Sheathing from Ice Damming
Ice damming can occur on any home with a pitched roof. Winter snow begins to melt from the heat escaping from the attic on the underside of the roof sheathing. As it melts, water runs down the roof towards the eaves. The portion of the roof that extends past the wall on the bottom of the roof (commonly known as the overhang) does not receive any of the heated air rising out of the attic, so the snow does not melt at this location. When the water reaches this point, it becomes trapped and begins to cool, resulting in an ice dam. As water begins to pool behind the dam, it will begin to rise until it has enough pressure to run backwards up the roof. Shingles are designed to drain water runoff from one direction only. When water reversed direction, there is not protection. Water can get up under the shingles as it travels backward up the roof until it finds a relief where it will again descend the roof plane – but this time under the shingles. This problem can not only happen at the eave location, but also in valleys, areas around protrusions such as pipes, skylights, and vents, and also at locations where the roof meets a wall. Damage to the eave line can also be caused by gutters that have not properly been cleaned. If eaves troughs are full of leaves and water can not get away, it will sit on the roof long enough to build pressure and find its way under the shingles.
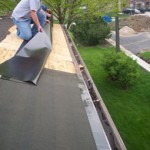
Appliction of WinterGuard
We design our roof applications so they will handle any type of water infiltration. The last layer of defence against the elements is the first layer applied to the sheathing, and it should drain as well as the top layer. That is why it is so important to use a product like WinterGuard. WinterGuard is a composite material of asphalt polymers, formed into a rolled sheet. The asphalt makes it vapor-tight, and the polymers make the asphalt elastic and sticky. This protective barrier is able to stretch and seal around nails driven through it. Placing WinterGuard a minimum of 24″ past the interior wall line at the eave provides the best line of defense against ice damming. WinterGuard is warranted against manufacturing defects and to remain watertight for the same period as the warranty duration carried by the shingles applied above it — up to a maximum of 50 years. This product can also be used under metal roofs and in other applications involving flashing details.
We use Winterguard as part of our underlayment process on a roof system, which is just as important as the shingles themselves. Shingles are designed to shed water, but they are not waterproof. When water does get underneath the asphalt, the sublayer must be able to handle it.
Some sure signs that ice damming may be occurring:
- Snow is melting but there is a line of ice or snow at the eaves that is not draining
- Water is dripping out of the soffit or gutter
- Shingles appear worn or faded on overhangs
- Shingles have rolling humps or dips on eave line
- Interior side of walls or ceilings have water damage under eaves
If you are concerned that ice damming is occurring on your home, give us a call and we will be glad to come out and make an inspection.
Designing for Insulation
March 1st, 2010
One of the most important steps in building a new home includes the insulation process. In the past, simply erecting the frame of a home and then coming back and insulating the structure as it stands was the standard. But today, higher utility bills and improved technology have given us the incentive and the possibility to improve our homes insulating performance dramatically.
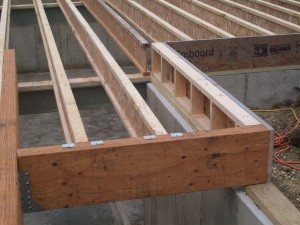
Knee Wall at Sill Location
Insulation must be considered in the design process of a home if it is to be put to its maximum potential. New home details such as cathedral ceilings, cantilevered floors systems, special nooks and so on that have become so popular with custom home building present new problems for insulation.
This picture is a perfect example. Engineered floor systems are superior to dimensional framing because of their stability in temperature and humidity changes, longer span capabilities, and straighter and more uniform characteristics. But they also pose a problem with insulation in one particular area: along the box sill, or the area between the top of the floor system and the top of the foundation wall. With a dimensional lumber (2×10, 2×12, etc.) floor system, a joist is usually placed on the outside of the floor system (often called the rim joist), and then insulation can be applied to this joist on the inside of the house. An enginered floor joist, or I joist, is constructed differently. The top and bottom of the joist are wider than the middle (web) portion. If a joist is placed against the rim on the outside of the floor system, it creates an uninsulatable gap in which warm air will leave the home. Instead of using an I joist for this location, if a knee wall is constucted in its place it will allow the framing to remain load bearing, but yet leave a space for insulation to be applied. After the framing is complete and the home is ready for insulation, the insulator can simply reach into the cavity and spray the entire wall with foam and thus achieve a completely sealed cavity and the homeowner does not have to worry about his hard earned cash slipping through the gaps in the floor and rushing into the cold winter air.
Little details like this can make a big difference in a home that will be in operation for years and years to come, whether it’s in the floor system, the construction of the corners and partitions, the attic and ventilation system, or any part of the house. Our company prides itself on making small but smart decisions like this to benefit the homeowner long after the job is done and our contract is fulfilled.
Insulated Beams
February 26th, 2010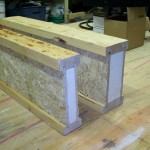
Insulated Beams for 4″ and 6″ walls
“Header” is carpenter lingo for any beam that transfers a load away from a door or window or any opening in a wall. It can bear roof and/or floor weight. Any opening on an outside wall of a home requires some degree of header. Depending on what the load to be carried is, the beam needs to be strong enough to handle it. In most cases a variety of dimensional lumber is used (2×10, 2×12. etc.) and is doubled up to carry the load. Span tables and wood species properties must be taken into account to size the beam accordingly.
However, a couple of beams of solid wood do not have the best insulating qualities. A new product on the market is both strong and smart. An insulated header is engineered to provide the necessary bearing while not giving up the heat loss you get from dimensional lumber. The beam is very similar to an I joist in design. It has two webs to give it the ample strength to provide the bearing requirements, and it has block foam insulation to prevent heat loss.
We love using it because it is much lighter than dimensional lumber, is much more stable in humidity changes, and there is no lining up and adjusting that comes with matching up two pieces of lumber.
The header comes in both 3-1/2″ and 5-1/2″ widths for 4″ or 6″ wall applications. This beam should not be used in place of major structural beams like Laminated Beams, but it can do everything a 2×12 can do. We started using this product on both new construction and remodel projects because it enables us to build more efficiently to benefit the homeowner in the long term.
Why Does my Ceiling Crack?
February 21st, 2010The Symptoms: I have noticed in the winter time that cracks have been appearing between my walls and ceilings. As it gets colder, the crack gets wider. I have even had it patched once but the crack came back the next winter. What is going on?
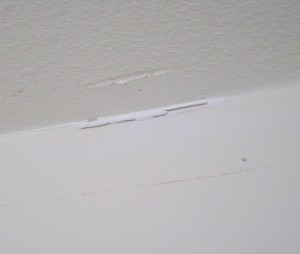
Cracks in the drywall between the wall and the ceiling
The Problem: This cracking cycle is all caused by the weather. Your roof is most likely built with an engineered truss system – where a single unit comprises both the rafter and the ceiling joist and is joined together with webbing and gusset plates. What is happening is called “uplift”, and it only happens to the interior walls of the home. The individual trusses that make up your roof system are constructed from #2 and better structural grade southern yellow pine, which like all wood will move with humidity and temperature changes. When the weather changes from warm to cool, the trusses react to the colder temperatures and lower humidity. The crack may go away in the summer time because the temperature and the humidity are high. At this time the truss is “swelled” or expanded slightly from the environment around it, and as a result it flexes pressure down onto the wall plate, tightening the crack in the wall/ceiling joint. In the winter time, the truss begins to “shrink” or contract. Since it is one unit tied together, the webbing of the truss will pull the bottom plate of the truss upward as it contracts. This is known as “uplift”. When it pulls up, the drywall on the ceiling comes with it, thus widening the crack. No matter how much insulation you have in your attic, you cannot prevent this uplift from occurring. The trusses will move unless the humidity and temperature of the surrounding environment is completely stabilized, which is not possible.
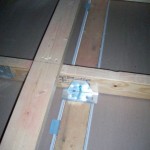
Truss Floater Bracket
The Solution: People have tried various remedies to combat this nuisance and prevent it from happening. Attaching the truss the wall with nails or screws only worsens the situation. As the trusses pull up, the walls will begin to lift as well, which can cause more cracking in the walls, out of adjustment doors, and floor squeaks. In some extreme cases, the wall can be lifted far enough off the floor to leave a visible gap.
The only solution to this problem is to use special hardware and techniques when installing the drywall. This is a picture of an attic just prior to insulation. You can see the truss floater bracket in place. This piece of hardware allows for the stability of the truss as it “floats” up and down with the seasonal changes. The outer tabs of the bracket project out over the drywall and keep it in place. The drywall must not be fastened with in 16″ of the location of the bracket so that the ceiling can flex as the truss moves but remain fixed at the wall location. The second smaller piece of hardware in the foreground is a drywall clip, which sandwiches the ceiling drywall and is attached to the wall plate to help keep the ceiling rigid. This piece can be used in conjunction with the floater bracket.
If your home was built without the use of this technique, the fasteners securing the drywall to the trusses at the wall location must be removed to eliminate this problem. Every fastener within 16″ of any interior wall location that is showing signs of movement must be located and removed, and some minor ceiling repairs will be necessary. An inspection of the attic to make sure no trusses are fastened to the walls would also be a good idea. You can contact us for an inspection to see how we can solve your problem.
Properly installing the drywall is a vital part of preventing maintenance issues and headaches for homeowners. Our company has professionals in place and we have the experience and the knowledge to save you time, money, and stress down the road. And our work comes with a guarantee, so you can rest assured that it will be done right!
